
chocolate / recipes / sweet+desserts / glutenfree / vegan / vegano
he other day I was wondering how to invent a new recipe. The first things that came to mind were memories. Memories from a journey, from childhood, from a book, from a restaurant, from something studied at school…..Then these memories mix with an idea or an actual product. In this way your mental taste library starts to combine different options. How can we make certain tastes? Sometimes it takes a lot of trials before you get the right balance.
In this case the original idea was a Bounty bar.
COCONUT + CHOCOLATE.
I had a flashback of my other half when he was younger and would eat several in one go……..
I searched out a few recipes on the Internet. I found my own way of doing the mixture and how to put it together. I used the recipe in a course on raw chocolate to demonstrate how to cover a mixture.
Up to this point I hadn’t really added anything new to the original recipe, except the important bit about making it a lot healthier. But I had only changed a few measurements. Then another way of making new recipes occurred to me: improvisation. I had a peanut butter and date mixture that I’d used in a workshop for filling some confectionary. What could I do with it? COCONUT + PEANUTS+CHOCOLATE: a mixture of Marathon and Bounty? Perfect! I had a new recipe.
Two weeks later, when I was due to take photos for my blog, my mental taste library threw some bananas into the mix! It was….wow. Success!
So I had a no sugar recipe made of natural ingredients that was easy to make, although there would be three distinct steps and that could be kept in stock in the freezer without losing their taste or texture. This should be enough to motivate you! Apart from all this and most importantly, they are DELICIOUS!
A few details before starting:
- check that the desiccated coconut you use doesn’t have any sugar added to it. It should only state ‘coconut’ on the label.
- As above for the peanut butter
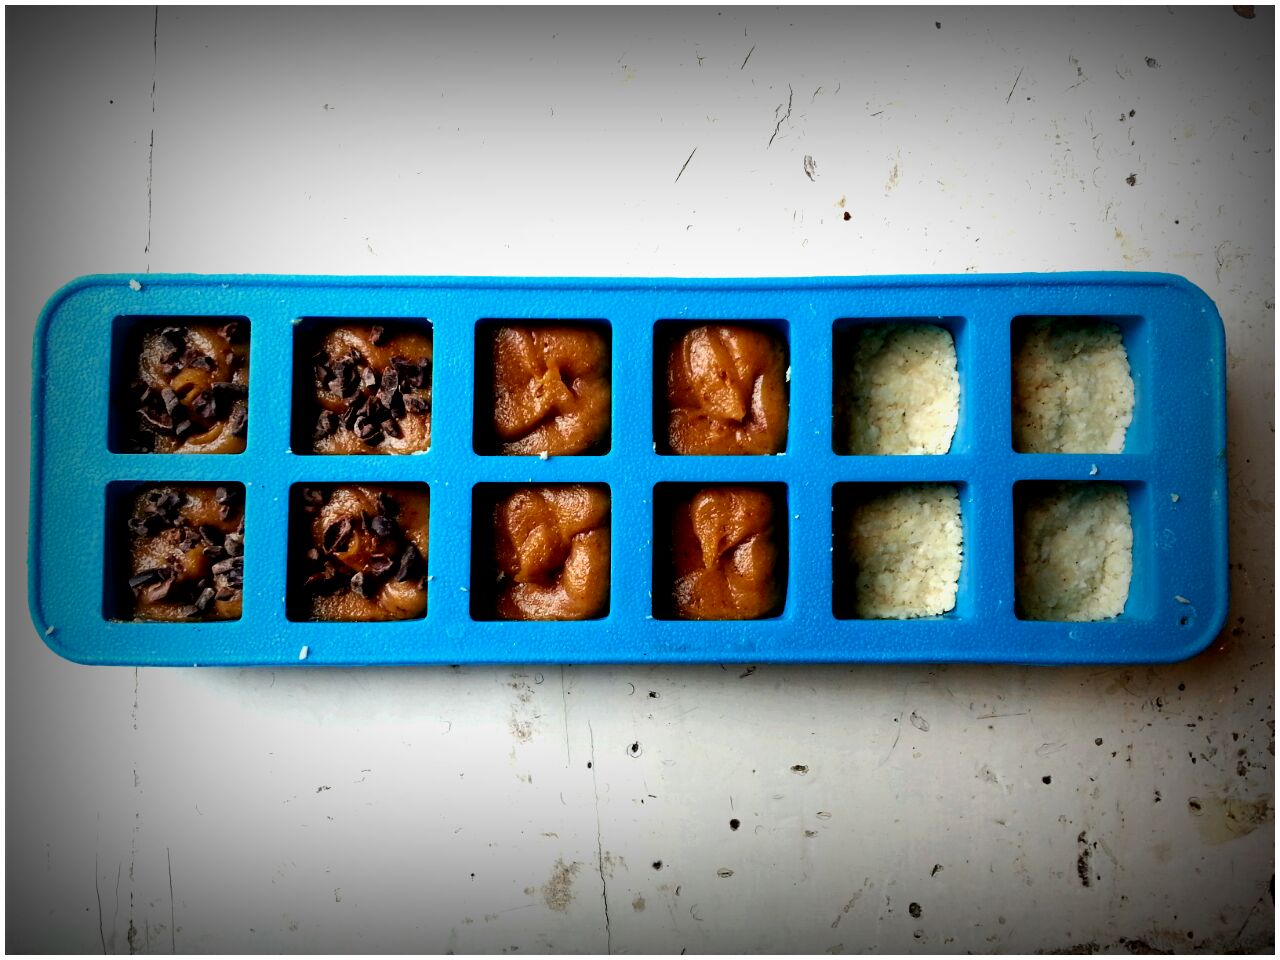
- I don’t recommend that you stretch the coconut dough and then cut it when it’s frozen because it will crack. You could also make mini versions using a flexible ice cube mould. If you find a flexible mini cake mould you can make them in the same way instead of making the shapes by hand.
- You can also try making it without the peanut and banana cream.
- If you are doing a chocolate coating make sure that it contains at least 74% cocoa. I’m giving you a recipe for a quick coating so the recipe can be 100% homemade.
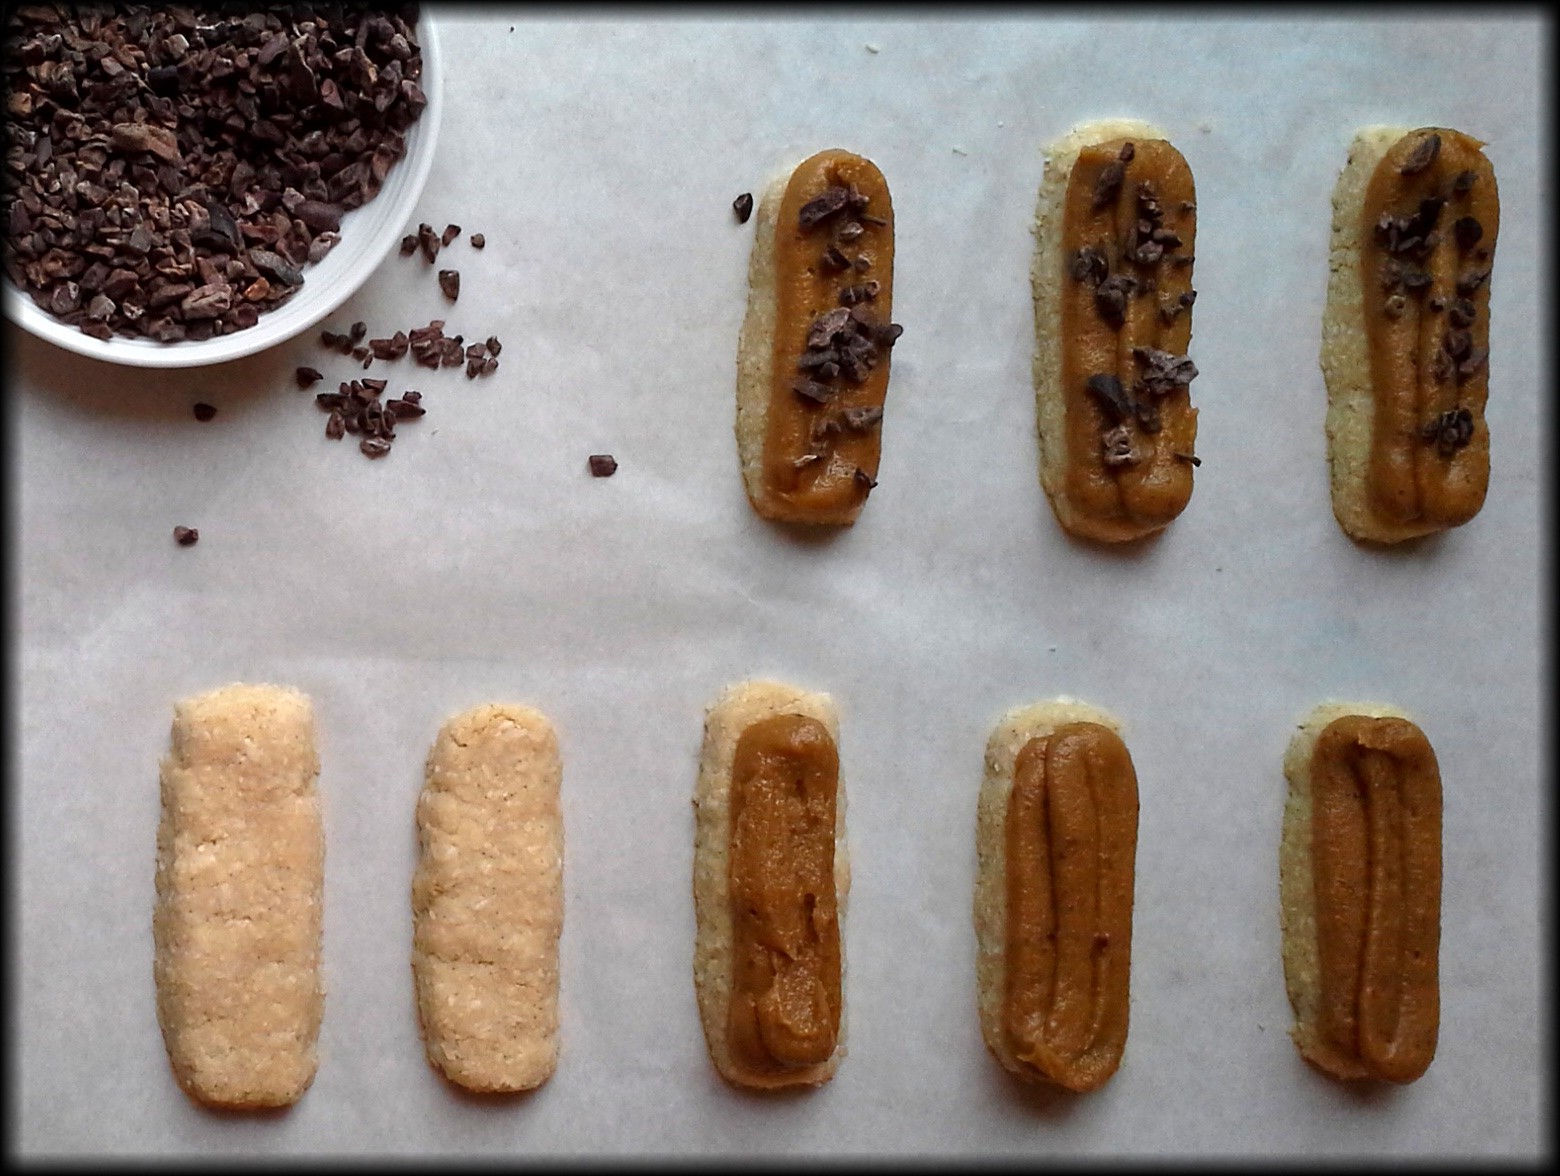
- The cocoa nibs (ground cocoa beans) give it a touch of crunchiness and bitterness. If you don’t have any you can also use ground peanuts or another dried fruit or nut. At the last minute I decided to put them together before freezing them because it was easier for me than putting the chocolate coating on them afterwards.
Now to get on with it! Tell me how it goes…..

Ingredients
COCONUT BASE
180 gr of desiccated coconut
40 gr of melted coconut oil
60 gr of maple syrup
1/4 tsp. of salt
1 scraped vanilla pod
1 tbsp. of cold water
PEANUT AND BANANA CREAM:
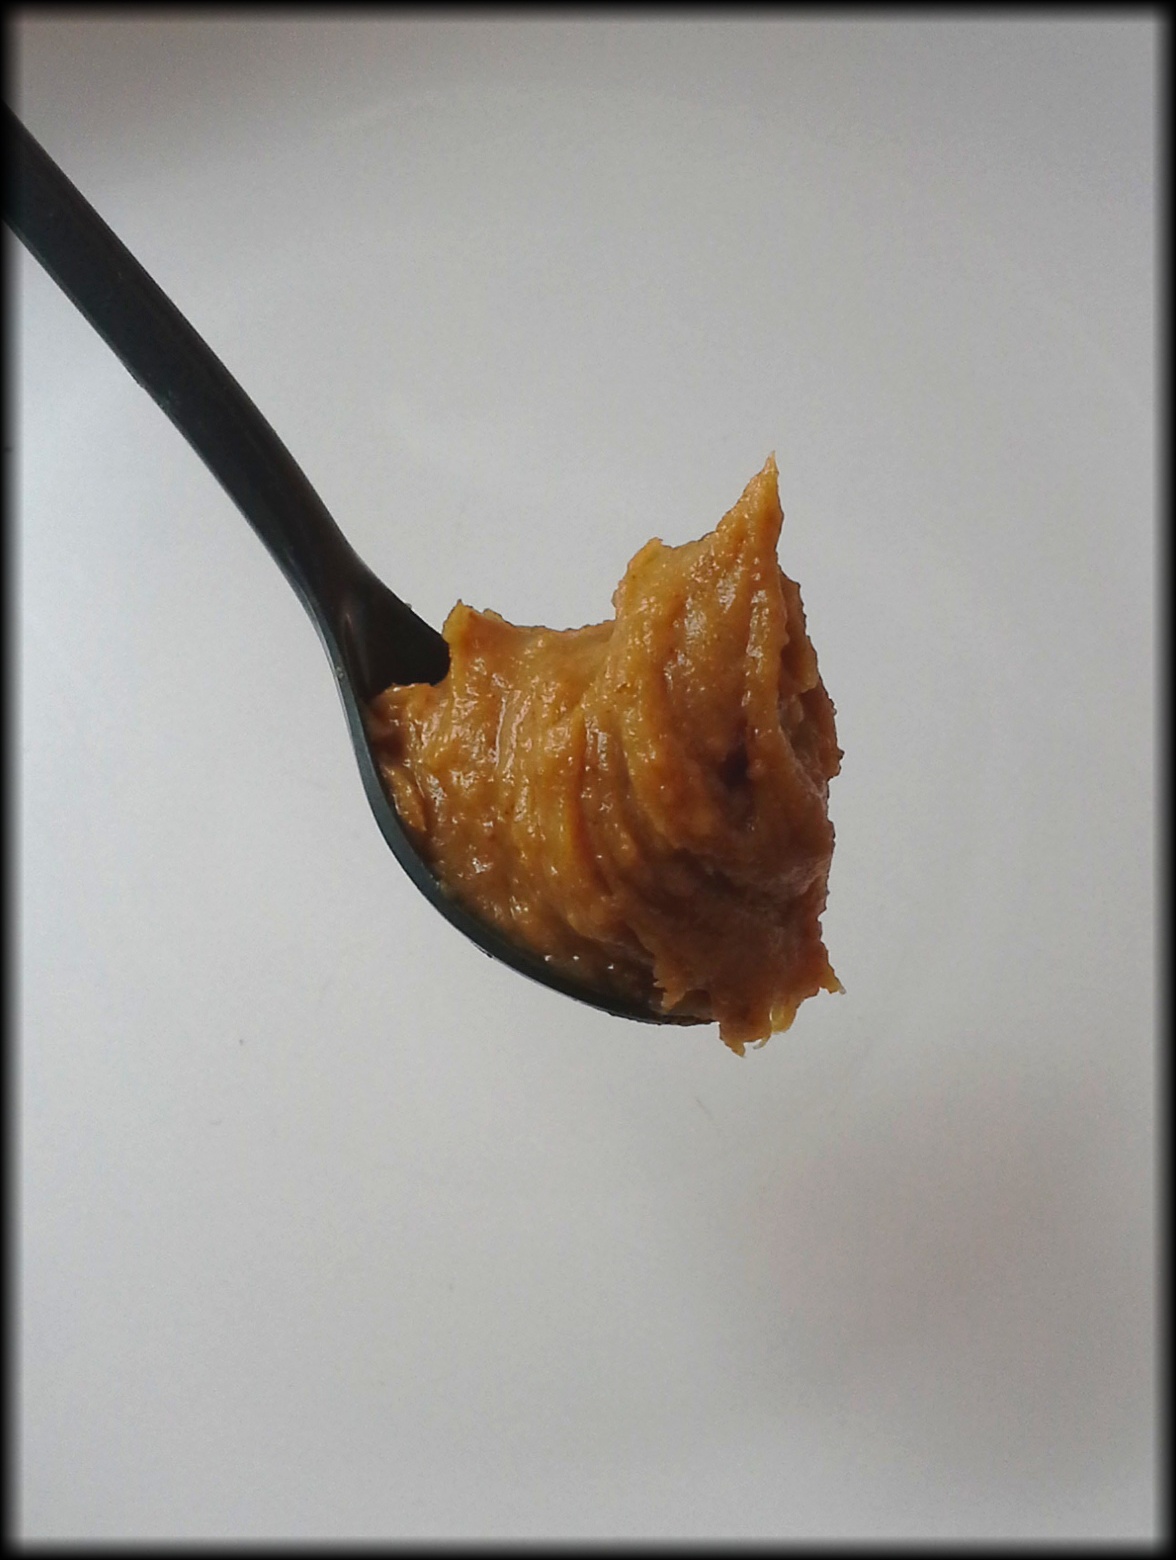
90 gr of banana (1 piece) peeled
125 gr peanut puree
4 medjool dates
(Cocoa nibs)
CHOCOLATE COVERING:
60 gr of coconut oil
30 gr of cocoa butter
60 gr of honey
30 gr of cocoa
1/8 tsp. of salt
instructions
- Start with the coconut base. Blend in a machine 80 gr of coconut until it looks like flour.
- Add the rest of the ingredients and blend for a further 5 seconds. The dough should be well mixed and should keep its shape when you squeeze it. Put it in a bowl in the fridge while you make the cream.
- In the same machine that you used to blend the coconut and without washing it, put in all the cream ingredients and blend them until you have a creamy mixture that you can spoon out. Put the mixture in a piping bag.
- Take the bowl with the coconut in it out of the fridge and make small rectangular shapes of 6x2cm with a 1cm thickness. Put them on a tray covered in greaseproof paper. You could also put the mixture in a mould, pressing it in well.
- Using the piping bag, put the cream on top, being careful not to go over the edges.
- Sprinkle the cocoa nibs on top and put the tray in a freezer for at least two hour.
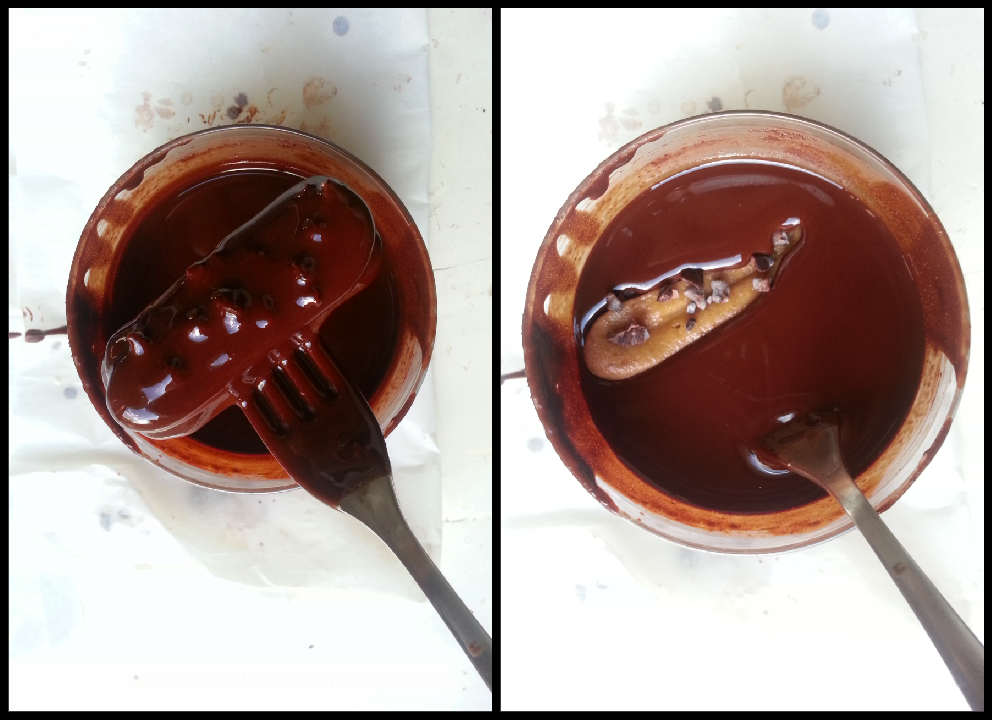
- Meanwhile, get the cocoa butter and coconut oil topping ready by melting it in a bain marie. When it’s properly melted, add the honey and salt and stir until fully dissolved. Take it off the bain marie and add the cocoa, stirring carefully with a stick. Put the bowl back on the heat but with the heat off while you wait for the bounties to freeze.
- Take the tray out of the freezer, stir the chocolate and using a fork dip each piece in the chocolate and then return it onto the tray. When you have done this, take a spoon of chocolate and do some decorations on top of the bars.
- You can put them back in the freezer and keep them in a bag or a Tupperware container. If you want one, you only have to take it out of the freezer and wait 10 minutes for it to be ready!
- They will last 5 days in the fridge or more than a week if they don’t have the cream.